Showing posts with label Makeup. Show all posts

Thursday, 24 January 2013

a modern spin on vintage

Before - no makeup!


After - rustic gold & brown eyes with a peachy pink lip

Top Tips for this look:

Apply a primer or a spot of concealer all over the eyes before applying your eye shadow to ensure maximum staying power!

When blending looks like this always use a shimmery shadow over the entire lid, the shimmery shadows blend better than the matt shadows, only use matt colours in the crease!

Exfoliate your lips before apply your lipstick, add a slick of gloss for a more glamorous look!

Much Love
.x KP x.


Wednesday, 23 January 2013

REVIEW: Astor Perfect Stay Lip Tint


There are many of these lip tint pens on the market, every brand and their dog have taken them out.  Astor is not a brand that I was aware of until I spotted their lip tints in Poundland, and to be honest I wasn't really keen on the whole concept of the marker pen like lip colours, but when I saw the Astor one for £1 I had nothing to lose, and thought i'd give it a bash!

I picked up the orange colour first, took it home and tried it immediately.  One end is like a marker pen tip, the other is a lip balm.  When I first applied the pen end on my lips it was really dry, I did not like it! I also found that it was quite dull in colour, I proceeded to apply the balm and was instantly on board.  The balm completely changed the look and feel, my lips felt so moisturised, not dry at all.  I left it on for a few hours, and it did not dry up or fade, it held the colour really well, even after eating and drinking it was still very evident that I had colour on my lips.

A few weeks later I was in Poundland again, I noticed that they had some more colours so I grabbed them, there were only 3 or 4 left.  I picked up the red and wine coloured lip tints, and the red has fast become my favourite.  The darker colours are much harder to work with than the orange.  The red/wine colours are very pigmented, and if you go outside your lip line it will stain the skin and it's a bit crap to get off, it's definitely long wearing, so you have to be careful.  Once you colour in your whole lip and apply the balm, the colour will last for hours.

A week past Saturday I went for dinner with my husband to celebrate my birthday, and I wore the red on my lips, we had a lovely meal and several glasses of Prosseco and it did not budge!  The picture below was taken after I got home, as you will see it is still very pigmented.


The only downfall of this product is that the pen itself seems to dry out quite quickly, and there is no way of making it work once the nib of the pen dries out.  I don't think the product runs out, I just think the nib dries out and then it makes it hard for the product to get through.  My two darkest colours have held up well and haven't dried out at all, but the orange colour has and I can't use it any more.  All in all I really like this product, it's definitely something I would recommend for a night on the town, you barley need to touch up, and for £1 this product is well worth it.

So get yourself down to your nearest Poundland and stock up!

Much love
.x KP x.

Monday, 7 January 2013

Golden eye!


Hey Beauties, It's been a while since my last makeup post, but I have been so busy with Christmas and lots of things happening and coming up, but I wanted to do a quick post on these pictures as they have been sitting in my blog pics folder since before Christmas.

I have a real thing at the moment for gold eyes, I did create this look before Christmas and now thats out the way it's maybe a little less relevant but it's still beautiful and subtle, and it's something that I would wear out for a glass of bubbly with the girls.  I did the eyes using my Urban Decay Naked Palette, and the lip colour is an Astor perfect stay lip pen.  I have a review on the lip pen coming up in the next day or so, so I won't go into detail but I am LOVING them, and they were only £1, yep that's what I said!

I returned to work today after having 2 weeks off, and despite finding it a struggle to get out of bed I was glad to be getting back into some sort of routine!  I am also uber excited as I am going to Glasgow next Monday for a Pro Makeup course, and it's my birthday that say too! I'm thinking of vlogging my time there, and starting a youtube channel, but I am a little sceptical about putting myself out there like that, we'll see!

Come back soon for my Astor lip review :)

Much Love
.x KP x.

Tuesday, 13 November 2012

1920's Glamour

On Saturday my dad threw a fancy dress party, and if you read my other blog Rockit Style, you may already be aware that I went as a 1920's flapper.  I love, love, love that era, the women were so glamorous, the clothes, make up and class, If I had a time machine to go back into the past my first stop would be the 1920's.

I loved creating this look, as always I've taken a snap of what I used to create it.

  • Foundation - Bobbi Brown long wear even finish in warm beige 3.5.  This is an excellent foundation and it's staying power is up there with Estee Lauder's Double Wear.
  • Real Techniques - Stippling Brush, I love this brush, it really blends in the foundation a must have for any makeup addict
  • Powder - I used the Maybelline Fit Me pressed powder in 125 nude beige, I always set my face with powder now, it really does make it last that much longer.
  • Concealer - I forgot to photograph my concealer but I used the Maybelline Fit Me concealer in 15.
  • Highlighter - MAC Cream colour base in Pearl Frost - I always use this on my cheek bones, nose and cupids arrow.  I also put a little bit under my eyes to really illuminated them for this look.
  • Blush - SLEEK Blush by 3 pallet in Sugar - I love this palette its my fave at the minute, I used the colour in the middle of the palette and its called Muscovado, its a shimmery gold and red, just beaut!
  • Eye shadow - SLEEK Storm Palette, I used the really light cream colour (second one on the top row)  all over my lid, then used the really dark brown (5th along on the bottom row) for  the corners, then blended it slightly into the center of the eyelid.
  • Eyes continued...- MUA Glitter eyeliner, in shade 2.  I love this stuff and at £1 it's incredible.  After I had blended my shadow into the crease and the middle of the lid, I then put the glitter liner all over the rest of the lid to create a super sparkly eye.  The pictures don't do the sparkle justice!
  • Eyeliner - Sephora eyeliner creme in smoky.  I lined my lash line and created a little flick at each end of the lids.
  • Mascara - Rimmel Scandaleyes mascara.  I lightly coated my lashes before applying lashes.
  • Lashes - I bought the lashes in Asda, they were reduced from £4 to £2, bargain! 
  • Lip Liner - NARS Damned lip liner, love this, if your not into a bright red lip then this is your answer to glamorous dark lips 
  • Lip Stick -NARS Scarlet Empress - love the name of this so movie-esque, rich colour too, delish!
  • Lip Gloss - Sephora nameless lip gloss, it's a very deep winey colour that compliments the NARS lipstick so well and it smells like marshmallows - yum!
VIOLA - 1920's glamour!


How cool are these lashes, when I first spotted them in asda, I didnt hold out much hope with regards to quality and lasting the night, but boy was I wrong! (this pic was actually taken at 1am)  They lasted all night, I am a DUO lash glue girl, but i'd ran out so I had to use the glue that was included but it worked really well.  I loved these lashes that much that i'm making a trip back to Asda at the weekend to stock up, after all there on sale! would be rude not to really!

Although I paired this look with my 1920's theme it's definitely a look I will be recreating for my Christmas parties.  The MUA Glitter liner was so glittery and stayed on all night, it dried fairly quickly and didn't cause any creasing.  I believe that MUA Cosmetics have an amazing 35% off all their products and free shipping over at their online store, and it's on for the week! You can check that out HERE

Much love pretties 
x. KP .x

Monday, 29 October 2012

When Bobbi B met Claire

On Saturday one of my best friends asked me to do her makeup for a wedding she was attending. Claire usually wears Estee Lauder Double Wear but on Saturday I gave her pretty little face a splash of something new to wear.  I used the latest Bobbi Brown long wear even finish foundation.  I can definitely say after wearing it for the last several weeks myself, its definitely my favorite at the minute (a full review to come soon)

My beautiful friend Claire after having her makeup done (forgot to take before pics)


Having your makeup done in daylight is a total must, as you can see these pictures were taken in a full stream of day light and it really shows the true effects of how your face will look when you step outside.  Claire's look was fairly natural with a slightly purpley/gold smokey eye and pink lips.  Clair doesn't have noticeable eyelids when here eyes are open so I took the colour on the lids up a little higher so that you could still see a hint of colour when her eyes were open.

Ingredients for Claire's look:


I also added a little bit of lipgloss and some Sephora setting powder to her face after her face was finished and then sprayed a little Urban Decay "All Nighter" on her face to keep her makeup in place for longer.  Claire said her makeup stayed on all day and night and she only needed to touch up her lips #excellent.

I am still a newbie to professional makeup application so any tips or tricks are always welcome!

Until next time beauties, Much Love
.x. KP .x.


Friday, 26 October 2012

Get lippy

Happy Friday lovelies!

Today I wanted to share with you my tip on storing lip sticks within your kit, this is a great idea especially if you have lots of lip sticks that your currently lugging around.  My kit is growing by the day, and its quite heavy, carrying tones of lipsticks obviously isn't helping the cause, so I was looking into other ways of storing lip sticks and loads of other makeup artists were "potting there lippies".  

So let me introduce you to the invention of "POTTING".....

Ingredients:

1x WH SMITH childrens painting set - £3.99 (bargain)
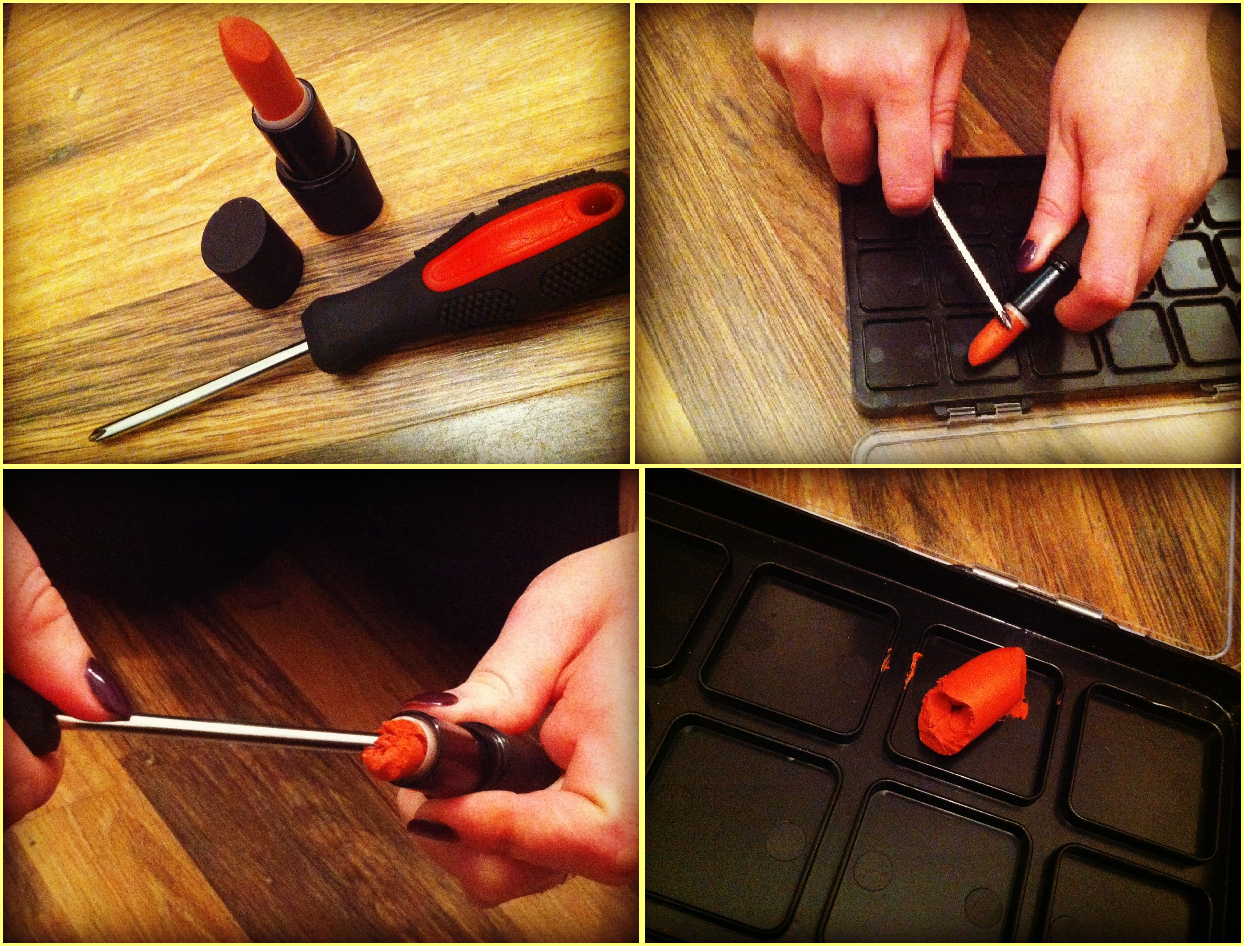
1x Screwdriver (any small thin poking type tool will work too)
The paint brush that comes with the paints (do not throw away)


When I was looking for storage containers to pot my lippies into, I considered using pill boxes (which can be found in the pound store), however they were quite bulky and had Mon-Sun subscribed on the boxes which wasn't very glamorous.  So on an outing to WH Smith one lunch time I spotted the above children's painting set, the container looked and felt quite sturdy, and at £3.99 I couldn't really complain even if it didn't work.  Child's paint set in hand, off I went to experiment, and it worked!  And it's bloody fantastic.

It really is very simple.  Open the paint pack and remove the paints inside, underneath you will see 18 blank squares. Select the lippies you want to de-pot and get to work ......


You can choose to do this as soon as you get a new lippy, or you can wait until you are down to the very last part of the lippy and scrape out what's left.  I personally like to do it as soon as I get my lippy, that way I am not carrying loads of loose lippies, and it's great to see all the colors that I have in one place, saves me raking around looking for a specific color.

So break off the top part of the lippy, drop it into a square, then using the other end of the paint brush (included with the paints) begin to mush down the lippy, and spread it around the square, once you have done this and its all pretty soft, use your screwdriver to get in and scrape out what's left inside the lipstick pot and repeat until all mushed.  It is amazing how much product is in the bottom of these lipstick pots and to think I used to bin them (the horror).  Once all lippy is picked out of the pot and mushed into the square, again use the end of the paint brush to smooth it all out (it doesn't have to be perfect, mine still has little lumpy bits, that's completely fine).  The black squares are very deceiving and you will come to find that 1 full lipstick fits comfortably into 1 square - amazing!

Continue to fill up your squares with colors until they are all complete and VIOLA!  Your very own lip pallet.


Once you are finished, close up the lid and pack away.  The lippies will harden up again, just like they were in their original packing.  Get yourself a good lip brush for applying them and your good to go!

This is by far the best pallet that I have found for storing my lippies, I still have a few more pallets to do, im quite geeky and like my stuff colour co-ordinated hence why this one isnt quite complete.

I hope you found this helpful, if you have any other tips for storing lippy that I need to know about, leave me a comment or get in touch.

Much Love 
.x. KP .x.