Happy Friday lovelies!
Today I wanted to share with you my tip on storing lip sticks within your kit, this is a great idea especially if you have lots of lip sticks that your currently lugging around. My kit is growing by the day, and its quite heavy, carrying tones of lipsticks obviously isn't helping the cause, so I was looking into other ways of storing lip sticks and loads of other makeup artists were "potting there lippies".
So let me introduce you to the invention of "POTTING".....
Ingredients:
1x WH SMITH childrens painting set - £3.99 (bargain)
1x Screwdriver (any small thin poking type tool will work too)
The paint brush that comes with the paints (do not throw away)
When I was looking for storage containers to pot my lippies into, I considered using pill boxes (which can be found in the pound store), however they were quite bulky and had Mon-Sun subscribed on the boxes which wasn't very glamorous. So on an outing to WH Smith one lunch time I spotted the above children's painting set, the container looked and felt quite sturdy, and at £3.99 I couldn't really complain even if it didn't work. Child's paint set in hand, off I went to experiment, and it worked! And it's bloody fantastic.
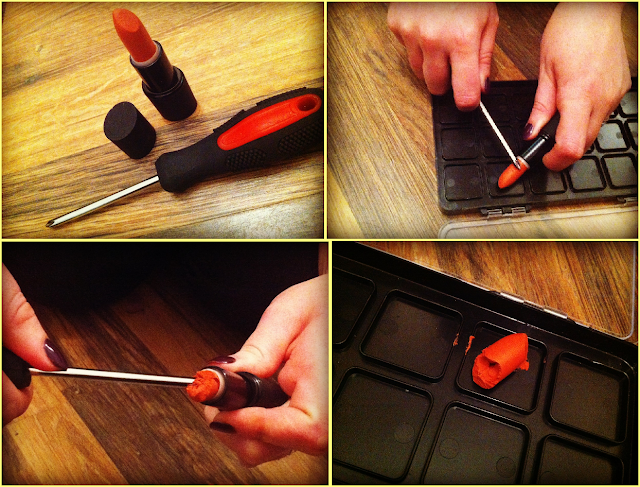
It really is very simple. Open the paint pack and remove the paints inside, underneath you will see 18 blank squares. Select the lippies you want to de-pot and get to work ......
You can choose to do this as soon as you get a new lippy, or you can wait until you are down to the very last part of the lippy and scrape out what's left. I personally like to do it as soon as I get my lippy, that way I am not carrying loads of loose lippies, and it's great to see all the colors that I have in one place, saves me raking around looking for a specific color.
So break off the top part of the lippy, drop it into a square, then using the other end of the paint brush (included with the paints) begin to mush down the lippy, and spread it around the square, once you have done this and its all pretty soft, use your screwdriver to get in and scrape out what's left inside the lipstick pot and repeat until all mushed. It is amazing how much product is in the bottom of these lipstick pots and to think I used to bin them (the horror). Once all lippy is picked out of the pot and mushed into the square, again use the end of the paint brush to smooth it all out (it doesn't have to be perfect, mine still has little lumpy bits, that's completely fine). The black squares are very deceiving and you will come to find that 1 full lipstick fits comfortably into 1 square - amazing!
Continue to fill up your squares with colors until they are all complete and VIOLA! Your very own lip pallet.
Once you are finished, close up the lid and pack away. The lippies will harden up again, just like they were in their original packing. Get yourself a good lip brush for applying them and your good to go!
This is by far the best pallet that I have found for storing my lippies, I still have a few more pallets to do, im quite geeky and like my stuff colour co-ordinated hence why this one isnt quite complete.
I hope you found this helpful, if you have any other tips for storing lippy that I need to know about, leave me a comment or get in touch.
Much Love
.x. KP .x.


